
Ready to add a dash of magic to your Halloween décor? We’ve conjured up two delightful DIY crafts that are as fun to make as they are to display: charming mini pumpkin flower arrangements and whimsical coffee filter bats. These projects are perfect for a cozy afternoon of creativity with the kids—no advanced crafting skills required! Whether you're aiming for a stylish fall centerpiece or playful hanging décor, these ideas blend spooky with sophistication. So, grab your crafting supplies and a cup of cider—it’s time to get delightfully hands-on this Halloween!

Halloween Coffee Filter Bats
These Halloween coffee filter bats are the perfect combination of easy, creative, and just a little bit spooky! Plus, they use materials you likely already have at home. Let’s dive in and make some colorful, fluttering bats!
Materials You'll Need:
- Coffee filters (white)
- Washable markers (black, purple, orange, or any Halloween colors)
- Spray bottle with water
- Clothespins
- Googly eyes (optional)
- Scissors
- Glue or tape
- A workspace that can get a little wet (like a tray or old newspaper)
Step-by-Step Instructions:
- Color Your Coffee Filter:
Lay a coffee filter flat and let your kids go wild with the washable markers! Use traditional Halloween colors like black, purple, and orange, or let them get creative. The goal is to cover as much of the coffee filter as possible with color.
- Spritz with Water:
Once the coffee filters are fully decorated, it’s time for the magic! Use the spray bottle to lightly mist the coffee filter. The washable marker ink will start to blend and spread, creating a cool tie-dye effect. Be careful not to over-spray; you want it to stay colorful, not soggy!
- Let Them Dry:
Leave the coffee filters to dry for about an hour. You can speed things up by using a hairdryer on low heat if your little ones are eager to see the final result.

- Add the Body:
Once the filters are dry, fold them in half. Take a clothespin and clip it in the middle of the folded filter, so that the filter looks like the bat's wings. The clothespin will act as the bat’s body.
- Googly Eyes for Extra Spookiness:
Glue on a pair of googly eyes to the top of the clothespin. If you don’t have googly eyes, you can draw them with a marker.

- Hang and Enjoy:
Clip your bats onto a string or curtain rod, or scatter them around your home for a fun Halloween decoration!
Halloween Fun Fact:
Bats are actually great for the environment because they help control insect populations! One bat can eat up to 1,000 mosquitoes in a single hour. So, these little guys are definitely friends, not foes!
Mini Pumpkin Flower Bouquets:

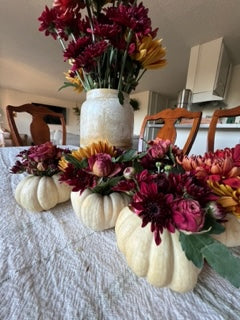
When Madigan, our Vignette marketing guru, shared photos of the mini pumpkin flower arrangements she made in our work group chat, I knew we had to feature them in this blog. They’re simply stunning! These charming mini bouquets blend pumpkins and flowers—two fall favorites—into one effortlessly adorable craft. Perfect for a cozy afternoon of creativity, these easy DIYs double as beautiful table decorations and are ideal for little hands to help with. Paired with our whimsical coffee filter bats, you'll have the perfect combination of spooky and chic to elevate your Halloween décor! Let’s dive in and make your home pumpkin-spiced and everything nice!
What You’ll Need:
- Small pumpkins (about the size of your palm)
- A mix of fall flowers (Madigan used Trader Joes flowers)
- Floral foam (you can grab this at any craft store)
- A spoon (for scooping)
- A sharp knife (for grown-up use only!)
- Water (to keep the flowers fresh)

How to Make Your Mini Pumpkin Flower Bouquets:
- Pick Your Pumpkin
Choose small pumpkins—think palm-sized! They can be any color, but white, orange, or even pale green pumpkins will really make those fall flowers pop.
- Cut Off the Top (Carefully!)
This is the part where the grown-ups take charge! Using a sharp knife, cut off the top of the pumpkin, about 1 to 2 inches below the stem, creating a little pumpkin lid. Make sure the hole is wide enough for your flowers to sit inside.
- Scoop Out the Insides
Time to scoop out those seeds! Kids can grab a spoon and start removing the pumpkin guts. Save the seeds for roasting later (bonus project, anyone?).
- Prep Your Pumpkin for Flowers
Take your floral foam and cut it down to fit snugly inside the hollowed-out pumpkin. Soak it in water for a few seconds so it’s nice and moist—this will keep your flowers fresh for longer.
- Arrange the Flowers
Now, for the fun part! Help your kids trim the flower stems to just the right height (about 4 to 5 inches tall), then push the stems into the floral foam. Have fun playing with colors and different flower types! You can go for a monochromatic fall palette, or mix bright oranges, reds, yellows, and purples for a full-on autumn explosion.
- Finishing Touches
Once your mini pumpkin bouquet is full of flowers, place it as the centerpiece of your table, or give it to a neighbor as a sweet fall gift! If you’re feeling extra fancy, tie a ribbon around the base of the pumpkin for some added flair.
And there you have it! Cute, simple, and bursting with autumn charm. Let those little hands get messy and creative—it’s all part of the fun! 🍂🎃
